

There is not a one-size-fits-all bidding strategy that will suit every person and every situation.
Every traffic source works differently, every traffic type is different, and every person’s style is different.
There are also factors such as budget size and which stage of optimization a campaign is in that will determine which bidding strategy would be more appropriate to use.
For these reasons, we cannot show a sample bidding strategy that everyone can apply to every situation.
However, thise will aim to describe some of the common bidding approaches to try, as well as considerations you can take into account, when formulating your own bidding strategy for your particular situation.
Goal and Factor to Consider When Bidding
First of all, let’s determine what the end goal is that we’re wanting to achieve.
Keep in mind that what we want to maximize is overall profit and not ROI. In other words, we’d much rather make a little less profit per 1000 impressions and get a lot more traffic, than to be making higher ROI on a small trickle of traffic.
most of you will agree that what we want to achieve is this: Maximized Traffic Levels and Maximized Traffic Quality at Minimized Traffic Costs with Minimized Time Investment.
Maximized traffic levels will allow testing and optimization to go faster.
Maximized traffic quality will maximize revenue, minimized traffic costs will increase your ROI in general, and minimized time investment means you’d want to keep from spending too much time making micro-optimizations that will result in such small increases in your overall profit that they wouldn’t be worth your time.
Each person will place different importance on each of these factors in different situations and probably at different times.
Examples of people with big vs. small test budgets:
- Affiliate A has a big test budget and wishes to test more quickly by maximizing traffic levels, even if it means having to pay more than is necessary (i.e. at the price of added traffic costs).
- Affiliate B has a very limited budget and wants to make each cent count. Therefore traffic costs need to be minimized at all cost – even if it means having to wait longer for tests to achieve statistical significance.
Note that the 2 factors above are inter-dependent
- By bidding more, it’s often true that you’d be paying more, but you will typically get more traffic, and for RON traffic that comes from many placements, bidding more will typically trigger traffic from better-converting placements.
- By bidding less, it may be true that you’d be paying less, but you may slow down your testing, and in the case of RON traffic you may never trigger traffic from the higher-quality placements.
Also note that some traffic sources don’t charge at the bid you specify (e.g. you may be charged slightly more than the next highest bidder), such that you can at times bid a lot higher to get significantly more traffic but not get charged that much more.
Traffic source nuances such as this can only be discovered when you test different bids and observe the resulting changes in traffic levels and conversion rates.
Bidding Strategies for Testing the Traffic
When you’re mass-testing offers or landers, it would make sense to bid in a way that would get you more traffic so you can test more quickly, but at the same time keeping costs acceptable.
Below are some common bidding approaches you can try.
Bid Low and Increase
Start at a low bid, run traffic for a certain time interval (e.g. every 15 minutes), note down the traffic you received during this time, increase your bid slightly and repeat.
How long you wait in-between bid changes will depend on how quickly the traffic is flowing. Obviously, the faster the traffic, the shorter each time interval needs to be and still give you an accurate estimate of traffic flow rate at each bid.
On the other hand, the longer you wait between bid increases, the more potential there is for data to be skewed by fluctuations at various times of day (e.g. more people will surf the net at certain times of the day).
So try to decide on a time interval that’s long enough but not too long.
As you raise your bid, the traffic you buy will become more expensive also. As you note down the amount of traffic you’re getting at each bid, it would be wise to also make a note of how much that traffic is costing you.
Some traffic sources are easy – you’re just charged at the price you bid (if this is the case then you wouldn’t even need to record the actual traffic cost at each bid, because you’d already know).
However, other traffic sources will charge lower than what you bid, or even charge differently for every placement due to what other bidders are bidding for a placement – it’s in these cases that you’d need to record the total traffic cost at each bid, for each time interval.
After doing this exercise, you’ll know for each bid, how much traffic you can trigger and how much it will cost you.
You’ll then need to select a bid that will trigger enough traffic to test quickly enough, and yet not cost you an arm and a leg.
Tip: Sometimes you will see that at a certain bid, the traffic levels experience a massive increase compared to the next lower bid, in which case you may want to bid at that amount to enjoy the jump in traffic levels at a relatively small increase in traffic costs.
After that, you can use this traffic to do your lander/offer testing. You may want to cut placements that are budget drainers, but try to ONLY cut the very worst because you need traffic for testing.
In the case where you’re getting a lot of traffic, by all means be more rigorous in cutting placements to reduce testing costs.
However, once you have a good offer + lander combo you may want to open up some of these previously-cut placements to see if they’ll be profitable with the new funnel.
Bid High and Reduce
Alternatively, you can repeat the process above, BUT instead start at the other end – i.e. by bidding high first, waiting and recording, then reducing your bid slightly and repeating.
Try both approaches to see which one suits the traffic source better. Some traffic source will reward you for “starting out strong”, i.e. starting at a higher bid, with more traffic or cheaper traffic.
Only testing will tell.A word of warning though: If you want to try bidding high, watch your campaign closely to avoid overspending. A safety measure would be to set a lower daily limit on the campaign spend.
However, know that some traffic sources will throttle your traffic levels when you set the daily budget low.
Start Multiple Campaigns at Staggered Bids
Another good method to determine what a good bid will be when testing offers/landers, would be to set up multiple campaigns at different bids and watching to see which one(s) give you the best value for your ad spend.
Find out what the bid range is for your targeting options (look that up in the traffic source’s inventory charts or just ask support) – i.e. the low + average + high bids for your targeting options (geo + device etc.) – and set up campaigns at these bids.
You can try setting up 3 camps – one at low bid, one at average bid and one at high bid. You can even set up more than that
e.g. 5 camps: really low bid, low bid, average bid, high bid, and really high bid. (Again, be careful about overspending when bidding high.)
Then just run traffic to all camps for a while until you see which one(s) is/are giving you the best ROI and yet acceptable traffic levels.
You can pick one camp to continue your offer/ lander testing and pause the rest, or pick two camps and use one to test landers and the other to test offers.
And as usual, even while testing, you may want to blacklist the worst placements to avoid unnecessary budget drain.
When You’re Done Testing and Want to Optimize Further
Sort Placements into Camps with Different Bids
So you used Approach 1 or 2 in the testing stage above, and after a few rounds of testing you now have a good offer + lander combo. You’re now ready to optimize your camp to further improve on ROI.
Run traffic to the good offer + lander combo for a while to collect conversion data. Then look at the placements that are giving you the most traffic and/or conversions.
- If a placement is breaking even or in loss but not hopelessly so, start a whitelist camp at a lower bid and transfer it to there. Don’t forget to remove that placement from the original camp.
- If a placement is in profit but not high ROI, just leave it in the current camp.
- If a placement is in profit and ROI is considerably high, can start a whitelist camp at a higher bid and transfer it to there to see if you’ll get more traffic and conversions from it.
Note that when analyzing placement stats, you’d want to ONLY consider stats resulting from the final offer + lander combo, and not judge a placement based on previous stats from when you were testing landers/offers. Otherwise you wouldn’t be judging placements fairly.
You would want to make notes to yourself whenever you put a placement into a higher-bid camp to see if it performs better, so that next time you check stats you’ll know to compare performance to decide whether to leave that placement in the higher-bid camp or put it back into the original camp.
This type of micro-management takes time, and is therefore only recommended for the larger placements that are worth your time. Remember that your time is worth something too!
Use Camps with Staggered Bids to Find the Ideal Bid for Each Placement
If you used Approach 3 in the testing stage above, and have found a good offer + lander combo after a few rounds of testing,
consider reactivating all your camps at the other bids to run the same offer + lander combo for a while, then comparing the performance of each placement across all camps to identify the best bid for each.
- When comparing performance of a placement across multiple camps, you’ll see that some placements will do better at certain bids than others. You can either
1) pick one bid where the placement appears to be doing the most profits at, and pause this placement in all other camps, OR
2) cut by ROI; say your ROI threshold is 30%, then simply cut the placement in all camps where it’s not meeting that threshold. Test both to see which one yields better results for your traffic source.
- Some camps may be getting so little traffic, or the ROI may be so low, that it won’t be worth optimizing. Consider cutting those to avoid wasting valuable time that could be better spent elsewhere.
These approaches will eliminate the need to transfer placements into other camps with higher/lower bids. With this approach, you simply cut placements that aren’t profitable for each bid camp.
Other Things to Consider When Bidding
- Remember that because every traffic source works differently, you’ll need to have a different strategy for each.
- Remember that on smaller placements, saturation is more of a problem, which means that conversion rates will drop over time, more quickly on some placements than others.
- Some traffic sources will give you more traffic if you increase your daily budget (even if your spending isn’t anywhere near your current daily budget), increase your overall campaign budget, or increase your account balance.
Strategy 1: Mapping The Landscape
How much should you bid on your traffic source?
That’s a question that rarely has a simple answer. And yet, bidding strategy can be absolutely key for your campaigns: the difference between positive and negative ROI, or between a $100/day campaign and a $500/day one.
This only useful for traffic sources where there’s no kind of “quality score” metric. leave? Most traffic sources. Most adult sources; all DSPs ( demand-side platform ) including platforms like Go2Mobi and Decisive; POF; and 90% of other traffic sources can be
mapped out with this system.
Finally, the traffic source needs to have realtime reporting, and you need to be able to adjust bids and expect those changes to take effect more or less in real time (plus or minus a minute).
What’s The Problem We’re Trying To Solve?
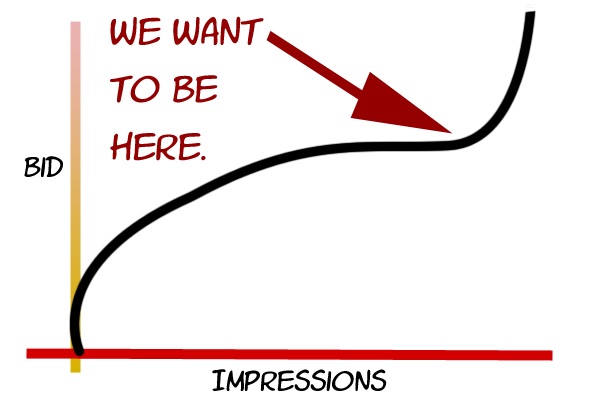
Put simply: we want to know where the sweet spot between ad price and ad performance is. Almost all traffic sources work approximately like this:
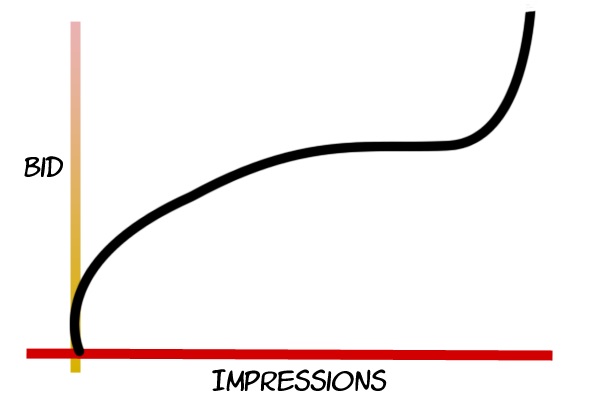
At very low bids, you’ll get no traffic, or almost no traffic. We want to avoid that, because no traffic means no conversions.
At very high bids, you’ll be put in ‘first place’ in the bidding, and get the maximum amount of traffic possible. Once you get above that maximum amount, you’ll get no more traffic no matter how much you bid.
If the maximum is $2 and you bid $10, you’ll get exactly what you’d have gotten for $2. We want to avoid that too because we don’t want to waste money, and that’s a total waste.
In the middle, there are sensitive points where a small increase in bid results in a large increase in traffic. We want to find those points, and position ourselves just on the right side of them.
Unfortunately, most traffic sources don’t publicise the curve of their graph – and it’ll be different for each set of targeting options.
So we need to test.
When Should You Do This Test?
You should use the test immediately after a campaign shows any promise, so that you can optimise bid along with other variables.
However, you can test at any point after that in a campaign’s development. If you have a mature, profit-making campaign and you haven’t done a bid-mapping exercise like this, it’s valuable to do one, because you may find that you can squeeze out considerable additional ROI.
Mapping The Landscape: Step By Step
You’ll need a couple of hours available to scope out your bid curve for each campaign with different targeting.
However, you can do other things at the same time. This time should be during the waking hours of your target geo – so not between about midnight and 9 a.m. for your target geo.
It should also be as close to the middle of the day as far as your traffic source is concerned as possible – in other words, not right after or right before daily budgets reset. You’ll need a timer – the simplest way is just to Google ‘Timer 5min’ or whatever you need.
For a smaller traffic source, you can go for 10 or 15 minute intervals. You’ll also need some budget available. You won’t need much; you can go through this entire process with the cost of about 5,000 impressions, sometimes less.
Make sure you have a daily limit set on your campaign, just in case one of these steps goes wrong. It should be reasonably high but not so high that if the campaign suddenly spends up to that limit you’re in trouble.
- Part 1 – Finding The Top Of The Curve
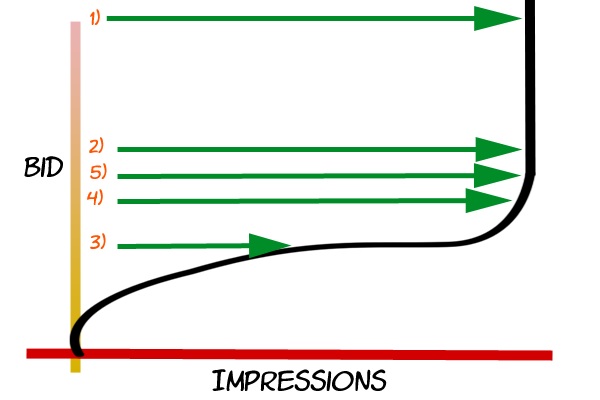
1) Start with a very high bid – $5 cpm is good opener, as very few traffic sources will go higher than that. Watch your campaign like a hawk for 5 minutes.
With broad targeting, traffic can come in very suddenly indeed, so you need to be prepared to act fast if you suddenly get a thousand impressions or more in the first minute.
As soon as you hit 500 impressions, temporarily pause the campaign. If you don’t hit 500 impressions in 5 minutes, note down how many impressions you got in those 5 minutes and pause the campaign.
2) Change your bid to half your previous bid and repeat. Again, pause when you hit 500 impressions, or note down how many impressions you had at the end of 5 minutes and pause then. Also note down the bid that caused that many impressions.
3) If you had approximately the same number of impressions per minute for 1) and 2), halve your bid again and repeat the test. Keep doing this until you get noticeably less impressions for one of your tests. Note down bid amounts against each impression amount each time.
4) Once you have found a bid at which the traffic reduces, enter a bid half-way between that bid and the previous bid. So, for example, if you find that the traffic reduces at $1.25, bid $1.88 (half-way between $1.25 and $2.50). Repeat the test.
5) If the result of 4) was approximately the same volume of traffic as in 1), then drop your bid down to half-way between your bid in 4) and your final bid in 3).
If it was noticeably lower, then increase your bid to half-way between your bid in 4) and the next highest amount you’ve bid already.
6) If the result of 5) is lower than the result in 1), then the next highest bid that you’ve tried is the approximate bid ‘ceiling’ for this targeting.
If the result of 5) is the same as or very similar to the result of 1), then the bid you used for 5) is your approximate bid ‘ceiling’.
- Part 2 – Mapping The Curve
This part is much more straightforward.
1) Adjust your bid to 80% of your ceiling bid. Restart the campaign and run it for 5 minutes, noting how many impressions you get against this bid level. Pause the campaign.
2) Adjust your bid to 60% of your ceiling bid. Test again as above.
3) Repeat for 40% and 20% of your ceiling bid.
4) Find the two points between which the number of impressions changes the most. Adjust your bid to exactly half-way between those, and test again. Note the result.
5) Plot all of those points on a graph in Excel. You now have a good map of the available impressions vs. cost per impression for this campaign.
You can now use this knowledge to choose your best bidding point, whether that’s the cheapest bid at which you’ll get actionable amounts of data or the best balance between price and volume.
Final Approch on this Strategy
Bidding systems are super-complicated, because they’re a live competition between advertisers. So you should be aware of these things when you use this method:
- This testing system does not address quality. On a lot of traffic sources, quality of impressions goes up as bids increase.
- The bid landscape will change over time. The bidding landscape here is entirely determined by what other people are willing to pay. As such, it changes over time. On most traffic sources it won’t change fast, because hundreds of people are contributing to the landscape and most of them are likely to change their bids rarely if at all, but you should periodically re-test.
- Bid volume varies over the day as advertisers run out of budget. That’ll be MUCH more pronounced on some platforms than others, but it’s a thing all over.
Strategy 2: Situational Bidding Techniques
Platforms that use some kind of “Quality Score” – Facebook, Bing and Adwords along with a few of the newest ad platforms just emerging – don’t respond well to an exploratory bidding strategy, or one that’s focused on bidding low.
Why? Because they use the performance of your ad to determine the price you pay per click. And just like on any other traffic source, the performance of your ad will be directly affected by the quality of the traffic your ad sees.
So the best strategy on any of these platforms is usually to bid high – even very high – at the beginning of your campaign.
That’ll ensure you get the best quality traffic, which will ensure that your ads perform as well as possible. And that will usually mean that the price you pay for a click drops way below the price you’d be paying if you bid lower initially.
There are more – much more – detailed tips and tricks for optimising each of these platforms, but as an overall rule of thumb, this one will take you a long way toward optimised bidding on Quality Score platforms.
Bid Testing For Traffic Quality – Non-Quality Score Platforms
Not all impressions are created equal, even on straight bidding platforms like DSPs (Go2Mobi,Decisive, SiteScout, etc). Generally, if you bid higher within the range of bids for your targeting,
you’ll get better **quality** traffic – less bots, better placements, and users more likely to convert.
Once you’ve mapped out the landscape for your bids, the best thing to do is to create 3 or 4 campaigns targeting a range of bids within the bidding range that will get you decent traffic – one at the top bid, one at about two-thirds up the range, one a third up the range, and one at the bottom of the range.
Then let them run for a few days and compare their performance. You’ll soon be able to tell if there’s a quality difference.
Testing For Time Of Day Changes
Bids can change radically over the day as other advertisers’ budgets run out, or day-parting kicks in.
If you have the budget and the time, the best way to map this change out is to run a mapping campaign (as in Part 1) several times in a single day, keeping it paused the rest of the time.
we’d recommend about a quarter of the way through the day, half way through the day, and three- quarters of the way through the day, where “day” here means your traffic source’s definition of the start and end of their day.
Beyond that, keep a close eye on the hourly volume of impressions you get. Watch for peaks and troughs. Try duplicating a campaign at a lower bid, one that normally wouldn’t get you enough traffic, and see if the traffic suddenly picks up at a certain point in the day.
Once you have this information you can use it to optimise your bidding.
For example, if you discover there’s a lot of cheap, good-quality inventory late in the day as advertisers’ bids are exhausted, you can deliberately bid lower than you otherwise would to capture that cheap inventory and boost your ROI.
Non-Bid-Related Bidding Factors
It’s important to remember that on a lot of platforms, your bid is not the only thing that affects the volume of traffic you receive.
For example, on many DSPs, your daily budget will also throttle the number of impressions you get.
If you’re bidding on a limited pool of traffic, that can often throttle your campaign to the point that you spend a lot less than your daily budget every day, as the DSP’s algorithms get their predictions a bit wrong.
Try doubling or tripling your daily budget and watch the increase in impressions – sometimes you’ll need to have a daily budget of $100 to spend $33/ day, for example.
On some platforms, available funds will also throttle your campaigns. In particular, if your available funds are very low but not zero (less than $100), that can result in your available impressions slowing to a crawl.
Finally, do check if the platform you’re on has any restrictions on content.
On some DSPs, for example, some kinds of ad will be allocated only “non-brand” or low-quality traffic. Ask the platform’s support team if this is the case, finding a way to get your campaign out of the low-quality bracket will often open up an enormous amount of
additional, lower-competition/higher-quality inventory.
Use The Source’s Data To Double-Check Volume
Most platforms will have indications of how much volume is available in a specific country or a specific targeting combination.
If they don’t, or if it appears to be out of date, you can and should also ask the traffic source’s support team what sort of volume is available for your targeting combination.
You can then use that number to check if there’s something reducing the amount of impressions you’re getting from where it should be.
This is a very useful trick to diagnose issues like daily budget limits, ad quality problems, or even errors on the traffic source’s end.
Don’t be afraid to get in contact with your traffic source and ask them for advice – whilst they’re not completely impartial, it’s in their interests to help you spend money with them!
How to Win a Traffic Bidding War
If you’ve ever found yourself locked in a bidding war with another affiliate, you’ll know how frustrating it can be.
Here’s a selection of tips that will try to stick by…
Raise Bids Slowly
If you’re going to trade punches with the competition, trade them slowly. raise bids just once or twice per day. The alternative is to get embroiled in a refreshing match. This benefits only the publisher.
A good tactic is to establish the likely timezone of your competition. If he is slow to outbid at 8pm, but on you like a whippet in the morning, that would suggest he operates in a different timezone, or to a different schedule.
Wait until later in the day to raise your bids and then hope that he doesn’t notice until the morning.
The other downside to aggressive outbidding is that it cranks up the emotional attachment to being first. You become more invested, which is dangerous. You don’t want to be invested in metrics that aren’t directly related to your bottom line.
Carpet Bomb the #2, #3, #4 and #5 Spots
Sometimes you can gain the top percentage of traffic without getting in to a bidding war.
By submitting new campaigns and slotting them in to spots #2, #3, #4 and #5, all priced just under the top bidder, you can often shave his traffic away while he’s busy drumming one out
over all the campaigns where he’s bidder #1. A very satisfying heist when the situation permits.
Keep Your Margins on Your Mind, and Your Mind on Your Margins
It’s common sense but often goes forgotten: Play the ball, not the man.
The second your focus changes from making money to engaging in the dogfight of beating somebody’s ego, that’s when you know you’ve lost. business objective is to make a lot of money by generating leads at a margin.
Nothing more, nothing less. This objective does not include being bidder #1 on every traffic source you find.
There will always be somebody driving more volume than you, and somebody happy to operate at a lower margin. That’s why you need to learn to cut your losses when a bidding war isn’t worth winning.
You can still make a lot of money by settling for a smaller slice of the pie and scaling sideways in to new markets, new countries and new traffic sources.
When the tactics above do not work, which they often won’t if your competitor has more ego than sense, it pays to call a truce while you’re operating at a margin that you are happy with.
Take second place and outwork him. Increase your output in new markets, optimize internally and start a game of lead-quality attrition.
If your competitors are spending every waking hour adjusting bids without working on their overall lead-quality, they may quickly find themselves ousted from the market completely.
Often the best way to win a bidding war is simply to stay in it. Easier said than done, but never worth forgetting.
Consider Following a Course ?
With Lifetime Access ?
We have been the number 1# platform for delivering most demanding course. Becoming Lifetime Member , You will receive all the Premium content For FREE
")
Consider Following a Course ? With Lifetime Access ?
We have been the number 1# platform for delivering most demanding course. Becoming Lifetime Member , You will receive all the Premium content For FREE